October 2019 – July 2020
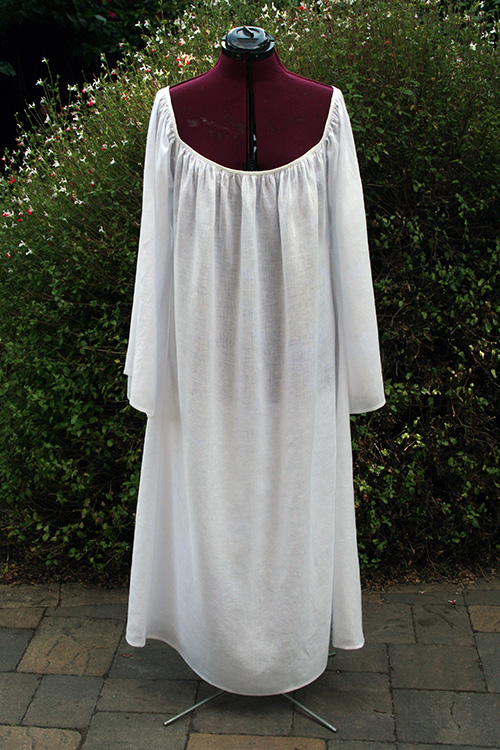
A 16th – 17thC Smock in 3.5oz linen. It’s cut very much like my other camicias. As it has a narrower body, triangular side gores were added to increase the width around the hem. If you would like to read all about my sewing process, please see the link below for a Smock Construction page. This garment is intended to be worn under a mid-17thC gown – the type with full sleeves and a low neckline.

I enjoy rectangular construction projects and have made quite a few tunics, shifts, chemises and shirts. For this latest smock, I thought it would be a nice change of pace to document the process. The pattern is very similar to the other three Camicias on my Medieval – 17th C Linens page, but with a side gore. If you’ve already sewn such a garment, or have done any rectangular construction, the details below will make more sense. This is not an historical method of sewing such a thing, it’s just how I do it. My write-up is somewhat heavy on details and light on overall assembly method. So for those interested in making something similar, I recommend the Chemise pattern at Festive Attyre – good for beginners and experienced alike. Though this garment goes by many names, Patterns of Fashion 4 seems to call them all “smocks”, regardless of cut. So that’s how I will refer to it.
Prepping the fabric.
The smock is made in 3.5 oz linen from Fabrics-Store. Not the best linen, but not the worst. It’s my go-to fabric for such a garment and has been readily available since I started sewing in 2004! The linen gets no special treatment – I just throw it in the washing machine and dry it on hot. Now it’s ready to be sewn.
For rectangular construction I cut the linen perfectly on grain. Threads are drawn to mark the cut lines. I will even pull a couple of threads along the cut edge, just to make sure it’s exact. This particular smock includes a side gore, which is a large triangle. So a paper pattern is made for that one piece.
Prepping the straight seams.
All seams get the same treatment. After pressing the linen, the seam is pinned together with fine, sharp pins that I use for everything. Then it’s hand basted in a contrasting color, making the thread easy to remove later. (Hand sewing is done with size 10 betweens). I often like to place my basting stitches outside of the seam allowances, which is unconventional. I feel it prevents stretching. (Yes, this could all be in my head!) These smock seams are machine sewn at 3/8″, so they’re basted at around 1/2″. The final flat-felled seam measures one-half of 3/8″, or 3/16″. With handkerchief linen, I’m reluctant to make seams any narrower for fear of fraying.
Intersecting corners can be tricky, so basting a little beyond the sewing point is helpful. The pin on the far left is where I will stop stitching. It’s also where two seams intersect, and the pin is keeping the other set of seam allowances out of the way. I’ve got a pencil dot there too, so when I remove the pin the point is still marked.

Machine sew and press the seam.
Tissue paper is placed between the fabric and the feed dogs since this is a fine fabric. After sewing, the tissue tears away easily and it’s pressing time. First I’ll press the seam flat to meld the stitches. Then press it open over a seam roll. My seam roll is actually a heavy duty cardboard roll. It has a nice sharp edge so I get a flatter seam. Finally, it is pressed from the facing side with a damp pressing cloth, also over the cardboard roll. Linen likes steam. (Incidentally, this is not an ad for Rowenta! In fact, I usually go through one of these irons every 9 months).

Seam is trimmed for flat felling.
I lay the linen on top of my sleeve board to raise the seam up and away from the rest of the fabric. Then place an extra ruler underneath to make a nice flat writing surface. Using a mechanical pencil, I mark dots 3/16″ away from the seam. In fact, I like to write all over my fabric in pencil, as you will see. Then trim off the seam at the dots!

Flat fell the seam.
I’ll finger press the 3/8″ side in half, then press well with the iron. The folded seam then gets pressed over the trimmed seam. Voila, one 3/16″ wide, flat felled seam. Judging by the linen’s grain lines, this is a side gore joining a body piece. At this point I’ll carefully pin the flat felled seam in place.

Baste the felled seam.
I’ve got the seam on top of my sleeve board to raise it up, a ruler under the fabric to keep the needle from getting stuck, and it’s time to baste the felled seam. Now I repeat, repeat, repeat, until all smock seams look just like this. These basting stitches may stay in for months before I get around to doing the last step – hand felling. And generally I complete everything else first. When all those raveling linen seams are tucked safely away I can breath easier. Once done, the smock will have no visible machine stitches.

The tricky intersections of gores and gussets.
To the right is a square underarm gusset, and to the left, a side gore. I like to leave a 1″ gap between gusset and gore, for sanity’s sake.
I don’t trim or clip anything for a few inches on all sides of these intersecting pieces. Not until everything else is sewn. I find this makes sewing the corners more accurate, and helps prevent clipping mistakes. I will mark my dots at 3/16″ (but not trim the linen), and seams may be temporarily pressed in place (but not basted). You can see how much room I leave to work on the intersection – the red basting stitches stop short of it by a couple inches. Once all four sides of the gusset and both sides of the gore are done, it’s time to fuss with these corners. Everything’s trimmed, clipped, pressed and pinned in place. When it achieves the state below, it’s time to baste.

From the outside, the underarm gusset is deceptively simple looking. Yay, that’s done.

Marking the neckline.
Each section of the smock’s neckline is gathered separately. In other words, the front, back, and sleeves all have their own sets of gathering threads. Below is just half of the front neckline. The center front is on the left, held in place with two pins. The blue gathering threads are secured at the sleeve seam. I like to anchor the whole thing to my seam roll and work on it in small, bite-sized sections.
Before any gathering is done, however, the wide neckline is laid flat and marked at intervals using color coded threads. (These are the red and white ties hanging over the seam roll). Below, the center front is marked with a white tie. White ties mark half-way and quarter-way points, and red ties mark the eighth-way points. I use cotton thread for both ties and gathering threads. They’ll stay in place for quite some time. Don’t want them melting under the iron.
Gathering threads.
Starting with the front, I place dots with a blue washable pen, at exactly 1/4″ from the neckline’s raw edge. Then run a row of gathering threads along those dots. This first row of gathering will also serve as a 1/4″ guide for sewing on the binding later. Two more rows of gathering threads are run: 1/8″ above and 1/8″ below. The gathering threads are color coded. For example, the front and back neckline may have blue gathering threads, while sleeves have orange. This color coding saves my bacon. The last thing I want to do is clip the wrong thread!
Taping the neckline.
I will now cut four pieces of 1/8″ wide twill tape for the neckline: front, back and 2 sleeves. My goal is to end up with a 46″ wide neckline. My front and back tapes are 12.5″ while the sleeve tapes are 10.25″. Each piece of tape is marked in pencil with half-way, quarter-way, and eighth-way points. Match these pencil marks to the red and white threads on the linen. Pin in place. Whew. Time to pull the gathering threads up.

A pause for some thoughts on the neckline.
In my opinion, what makes these particular smocks difficult is the wide, gathered neckline. My aim is a correctly-sized and stable neckline, with pretty pleats or gathers, and a smooth binding. Not too much to ask, right?
A period method, presumably, is to bind the neckline with linen strips cut on the straight grain. Obviously much more stable than a bias binding. But I’m never happy with the way straight grain binding lays. I know from experience not to waste my time attempting it as I will inevitably rip it all out. With each smock made I’ve taken a different approach. Sometimes trying more than one thing on the same smock. Yet, every time the neckline ends up an inch or two too big. Which then has to be resewn, or even repleated. Part of my goal for this smock was to work out a more reliable, or at least, systematic method.
So, before I continue with my step-by-step taping process, let me back up and show what I tried first. This is a machine-gathered neckline, taped with a strip of batiste selvage. The tape would have been left in place permanently. It was a worthy experiment. I’d never actually tried machine gathers on a camicia before. They don’t look too bad. Since machine stitches lock the pleats in place, controlling the neckline width was simpler, more accurate, and faster. But in the end I wanted less bunching and overlapping of pleats. There may still be a viable solution here. But going back to a hand gathered method seemed like a better choice at the time.
So, back to that tape….

Sewing tape to linen.
The bottom of the tape is lined up along the middle (1/4″) row of running stitches. This tape is a temporary measure to hold the pleats in place. It will eventually be removed. Each pleat is caught to the tape with a single stitch. In retrospect, I could have made my life easier by lining up the tape closer to the raw edge. It ended up getting in the way when it was time to add the binding.

Taping is done. The smock can now be tried on.
If neckline width is good, I press all the tiny pleats flat. I’ll be binding this in a bias cut strip of linen and the tape will eventually be removed. So at this point I run the pleats under the machine, to lock them in place. This machine stitch can either be above or below the tape. As it happens, I want to machine sew 1/4″ from the fabric’s edge. Which is exactly where I basted my tape. Oops. So instead I machine through the middle of the tape and again below it at about 3/8″.
Even with all the basting, it’s still hard to avoid a few twisted or flipped pleats when you run it through the machine. So, as a final step, the pleats can be neatened a bit. A very unscientific process – working from the outside, I just scoot them around and even them out. Usually removing some of the machine stitching in the process. After a lot of fussing they’re still far from perfect. But at some point I call it quits. Then hand baste my changes. The hardest part is now done.

Baste bias binding to neckline.
A linen bias binding with a finished width of 3/8″ is pressed. I mark the binding at CF, CB, sleeve seams, as well as quarter-way marks. The binding is pinned to the smock. The folded edge lines up 1/4″ from the fabric’s edge, or along that middle row of gathering stitches. (The tape is also sewn at 1/4″. And as I mentioned earlier, it’s still in the way! I baste the binding below the tape.) The binding is basted from the outside, right along the fold line (it’s basted in red but difficult to distinguish from all the other threads here).

Remove tape (finally – get that tape out of the way!). Open the binding and machine sew next to the red basting. This is what it looks like after basting is removed.

Remove gathering threads, press binding in place.
I like to leave one row of machine stitching inside the binding. Or add one if it isn’t already there.
Since bias linen stretches like crazy, the binding will not be a consistent width all the way around the neckline. So I fuss with the outside edge of the binding until it’s all the same width, or 3/8″. Any extra width is pressed to the inside. Once it’s perfectly even, I’ll baste near the fold line to lock this width in place. The outside binding is now nice and even. I’m happy with this.

But the inside is not!
Below, you can see how the inside binding widens out below the curve. We’re talking about 1/16″. But it bothers me. So more blue, washable pen dots are added. The inside binding is refolded along the dots, and pressed until it is perfect too. Then another row of basting on the inside binding. Remove any visible machine stitches (in this case I have a row at 3/8,” right below the binding).

Yay, it’s Done!
The last step is to hem the body and hem the sleeves. These are 1/4″ wide hems basted in place. The smock is now quite literally basted together, but at the same time it’s finished. All ready for hand sewing.
